Setting up Lighting for Portraits for Beginners at Home: Master the Basics
Are you hesitant to try setting up lighting for portraits at home because you think it’s too complicated or requires expensive equipment? Don’t worry, we’ve got you covered.
In this discussion, we’ll show you how simple and accessible it can be to create stunning portraits right in your own space. From using natural light to exploring different lighting setups with basic gear, you’ll soon realize that capturing beautiful portraits is well within your reach.
So, let’s dive in and discover the secrets to achieving professional-quality lighting for your portraits, without the need for a professional studio.
Key Takeaways
- Natural light from large windows can be used for soft, diffused lighting in portrait photography.
- A speedlight/flash can provide more control over lighting, and bouncing it off a white wall or ceiling can create softer light.
- A reflector is a versatile tool that can bounce light back onto the subject, filling in shadows and creating more even illumination.
- Using a tripod can help keep the camera steady for longer exposures, especially in low light situations.
Table of Contents
Essential Gear:
When it comes to setting up your home portrait studio, there are a few essential gear items that you’ll want to have on hand.
Natural light is your best friend, so utilize large windows for soft, diffused light.
Additionally, consider investing in a speedlight/flash for more control over lighting.
A reflector can also be helpful to bounce light back onto your subject.
And don’t forget a tripod to keep your camera steady.
These tools will help you create stunning portraits right in the comfort of your own home.
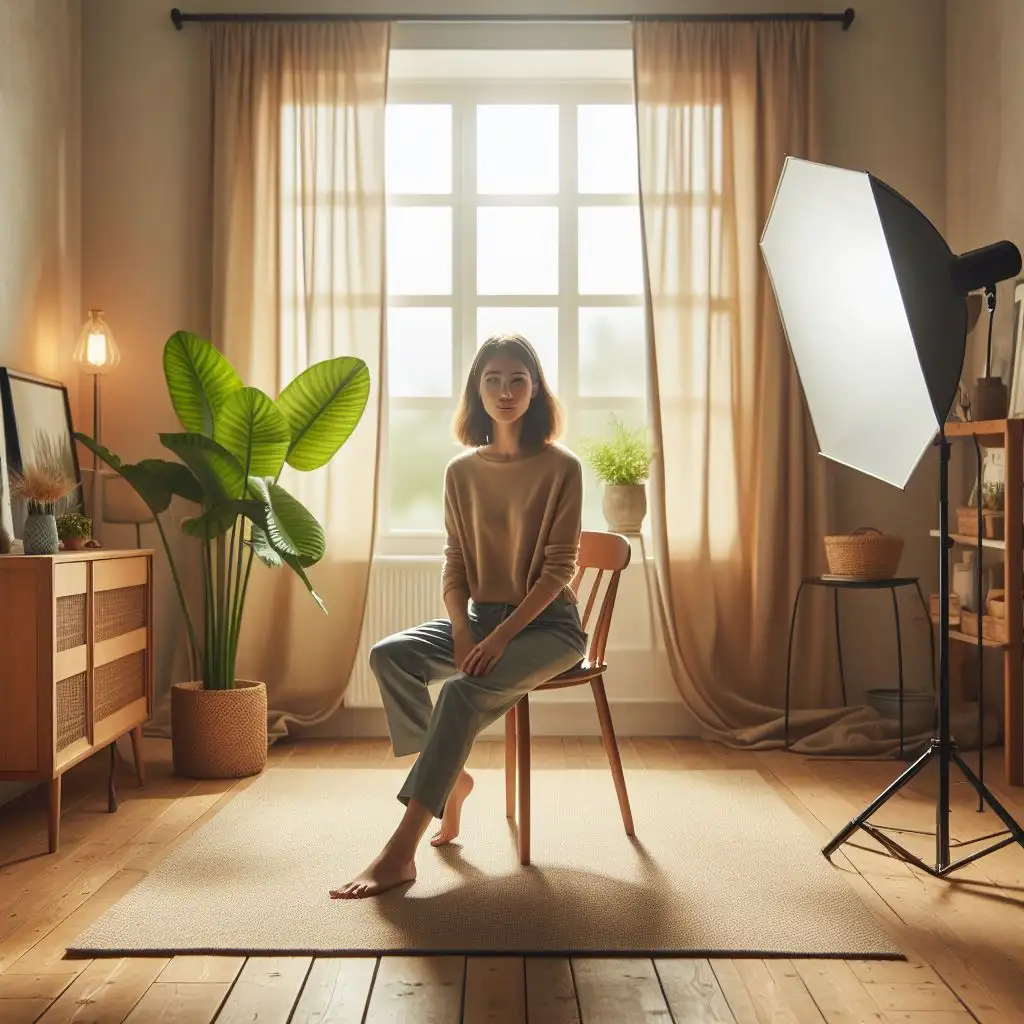
Natural Light:
Utilize natural light, your best friend when setting up your home portrait studio. Using large windows is a great way to achieve soft, diffused light for your portraits. Position your subject near the window, but be sure to avoid direct sunlight as it can create harsh shadows on their face.
To create a more flattering and even illumination, you can also try using diffusers or curtains to soften the light even further.
Speedlight/Flash:
To enhance your portrait photography, incorporating a speedlight or flash into your gear collection is essential. A speedlight gives you more control over lighting and allows you to create various effects. Here are some key factors to consider when using a speedlight:
| Flash vs. Continuous Light | Pros and Cons |
|---|---|
| Flash | Provides more power and control |
| Portable and versatile | |
| Can freeze motion | |
| Continuous Light | Consistent illumination |
| Easier to see the effect | |
| Better for video |
Using gels with speedlights is a great way to add creative color to your portraits. Gels are transparent colored sheets that you can attach to your flash to create different moods and tones. Experiment with different colors to enhance your images.
DIY diffusers are affordable alternatives for softening your flash. You can create your own diffuser using materials like white plastic bags, shower curtains, or even tissue paper. These diffusers help to spread and soften the light, reducing harsh shadows and creating a more flattering result.
Creative lighting techniques, such as playing with shadows and highlights, can add depth and dimension to your portraits. Experiment with different angles and positions of the light source to create interesting and dramatic effects.
Taking your portraits to the next level involves using off-camera flash. This technique allows you to have more control over the direction and intensity of the light. By positioning the flash away from the camera, you can create more dynamic and professional-looking portraits.
Incorporating a speedlight or flash into your portrait photography setup can greatly enhance your images. Whether you’re using gels, DIY diffusers, or experimenting with creative lighting techniques, don’t be afraid to push the boundaries and explore the possibilities of off-camera flash. Your portraits will thank you for it.
Reflector:
Incorporating a reflector into your portrait photography setup is another essential gear choice that can greatly enhance your lighting techniques. Reflectors are particularly useful for outdoor portraits and can help you control and manipulate natural light.
There are different types of reflectors available, including silver, gold, white, and translucent. Each type has its own unique effect on the lighting and can create different moods in your photos.
To use a reflector in natural light photography, position it opposite the main light source to bounce light back onto your subject’s face. This will help fill in shadows and create more even illumination. Experiment with different angles and distances to find the optimal positioning for your reflector.
If you don’t have a reflector, you can use alternatives such as white foam boards or even a piece of white fabric to achieve similar results.
Tripod:
A tripod is an essential piece of gear for portrait photography. It provides stability to your camera and allows for longer exposures in low light situations.
When it comes to tripod stability, it is important to look for a sturdy and reliable tripod. Make sure that it can support the weight of your camera and lens. Consider the tripod height as well, ensuring that it can be adjusted to your preferred shooting level.
When positioning your tripod, it is crucial to place it on a stable surface. Ensure that it is securely locked in place to prevent any accidental movement or shaking.
It is also important to check compatibility between your camera and tripod. Some tripods may have specific mounting systems that may not be compatible with your camera.
If you don’t have access to a tripod, you can explore alternatives such as using a stable surface or leaning against a wall to minimize camera shake.
Basic Lighting Setups:
Now that you have the essential gear in place, let’s explore some basic lighting setups to enhance your portrait photography. These setups will give you more control over the lighting and allow you to create different effects and moods in your portraits.
The four setups we’ll discuss are the One-Light Setup, Two-Light Setup, Butterfly Lighting, and Rembrandt Lighting. Each setup offers its own unique characteristics, so let’s dive in and learn how to achieve stunning results with these lighting techniques.
1.One-Light Setup:
To achieve a simple and natural lighting setup for your portraits, position your light source slightly off-axis from your subject’s face. You have several options for different light sources, such as a flash, continuous light, or even a window. Experiment with positioning the light at a 45° angle to create natural-looking shadows on your subject’s face.
If you’re using a flash, consider using a diffuser to soften the light and avoid harsh shadows. Creating natural-looking shadows adds depth and dimension to your portraits. You can also experiment with fill lights to brighten shadows on the opposite side of the face.
2.Two-Light Setup:
For a more advanced lighting setup in portrait photography, consider using a two-light setup to add control and dimensionality to your images. With a two-light setup, you have the opportunity to experiment with lighting placement and fill light positions to achieve the desired effect.
The main light should be positioned similarly to the one-light setup, slightly off-axis from your subject’s face. Then, add a second light, usually weaker, as a fill light to brighten the shadows on the opposite side of the face. This helps in controlling shadows and creating a sense of dimensionality in your portraits.
Remember, the key to mastering the two-light setup is through experimentation. Try different positions for the fill light and observe the impact it has on your images.
Have fun exploring and discovering new possibilities with your lighting setup!
3.Butterfly Lighting:
To further expand your understanding of basic lighting setups in portrait photography, let’s now explore the technique of butterfly lighting.
Butterfly lighting is a popular setup that creates a soft, flattering look with minimal shadows. To achieve this, position your light source directly above your subject and slightly forward. You can use lighting equipment such as a large diffuser or bounce the light off a white umbrella for even softer results.
The key is to create even, diffused light that illuminates your subject’s face evenly. By using diffusers and reflectors, you can control the intensity and direction of the light. This setup is great for creating flattering shadows and highlighting your subject’s features.
Don’t be afraid to experiment with different light sources to find the perfect look for your portraits.
4.Rembrandt Lighting:
Rembrandt Lighting, named after the famous Dutch painter, is a classic portrait lighting setup that adds a dramatic touch to your photos by creating a triangular patch of light on your subject’s cheek. By positioning the light source at a 45° angle from the subject and slightly above eye level, you can achieve this striking effect.
Experimenting with different light angles is key to mastering Rembrandt lighting techniques and creating dramatic portraits. The size and shape of the triangular patch can be controlled by adjusting the distance and angle of the light.
This setup also allows you to control shadows, adding depth and dimension to your images. With Rembrandt lighting, you can tell captivating stories through your portraits, evoking mood and emotion.
Tips for Beginners:
As a beginner, it’s important to start with simple lighting setups and gradually experiment with more complex ones to enhance your portrait photography skills. Here are some tips to help you get started and enjoy your journey:
-
Relaxing subjects: Direct your subject to relax and engage with the camera for natural expressions.
-
Clean backgrounds: Pay attention to the background and avoid distracting elements. Use white or neutral backgrounds for a clean look.
-
Colorful backdrops: Incorporate colorful backdrops for added mood and creativity in your portraits.
-
Experimenting with lighting setups: Don’t be afraid to try different lighting setups and see what works best for your style.
-
Have fun and explore your creativity: Remember, photography is an art form, so let your creativity flow and enjoy the process.